
Development Blog #3 - Integrating ShowIO: QLAB
So far, we've been exploring how and why we made ShowIO. But let's get down to brass tacks: how can we use ShowIO in a show?
Today, we're going to explore how to connect another device to ShowIO, and show off how to use QLab and ShowIO to synchronize physical effects with sound cues.
Getting Connected
Before we get ShowIO talking to any of our show software, we're going to need to get an Ethernet connection going to a computer. For these examples, we're going to be using Mac OS, but ShowIO can connect just as easily to Windows and Linux PCs, as well as specialty hardware like lighting consoles and playback servers.
Setting ShowIO's IP Address
The first step is to set the IP address on the ShowIO device we want to connect to. We've tried to make it as easy as possible to configure ShowIO out of the box, and hopefully it'll be familiar to our friends in the lighting world who are used to setting DMX addresses.
We can use the onboard DIP switches to choose an address, 0-255 (really, 1-254; 0 and 255 are off-limits for ~network reasons~), for each ShowIO device on our network. We do this just like addressing a DMX fixture; by turning on or off each of 8 DIP switches, we can to set a binary representation of a one-byte number (if you're interested in learning more about how this works, Google "set DMX address dip switch"). This byte will be the last number in our device's IP address; if we set our DIP switches to address 31, our IP address will be aaa.bbb.ccc.31. Don’t pay attention to switches 9 and 10 yet - those are for more advanced configuration that’s out of scope of today’s blog post (read: we’re not done implementing it in firmware yet).
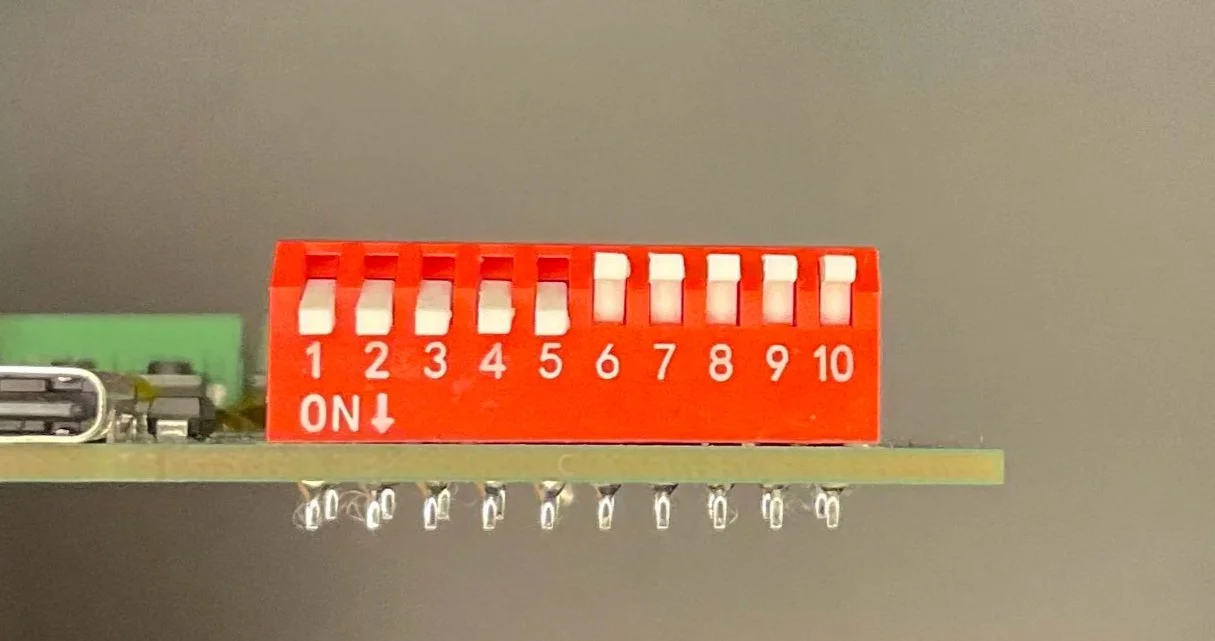
Setting IP address .31 using onboard DIP switches
Every ShowIO device ships out of the box with the first three numbers aaa, bbb, and ccc set to 192, 168, and 10. So our device IP becomes 192.168.10.31.
Setting Our Computer’s IP Address
Now that we've set the IP address on our ShowIO, we need to set the IP address on our computer. Remember how the first chunk of our IP address is 192.168.10.? We need to set our computer to another IP address with that same prefix (like 192.168.10.21), and set our subnet to 255.255.255.0 to make sure our network is restricted to only devices with the same 192.168.10. prefix that we have.
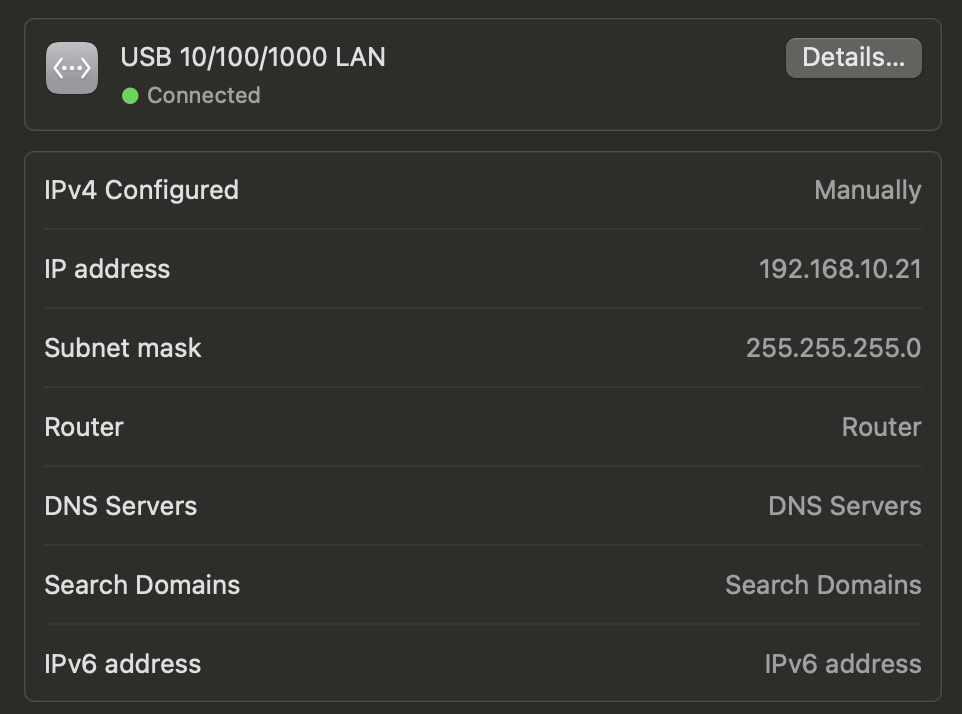
Mac OS network settings
Checking the Connection
Once the IP address is set on our ShowIO and on our computer, the only thing left to do is verify the connection. Let's do that from the terminal by pinging ShowIO with the command **ping 192.168.10.31**:
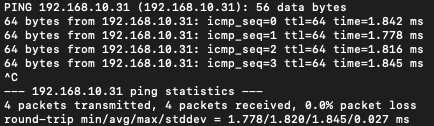
Ping command results
Great! We've got clear lines of communication between ShowIO and our computer. Now it's time to put ShowIO to work.
QLab Integration
Since I'm writing this on Halloween, let's say you've got a scare in your haunted house that needs to synchronize a sound cue with an animatronic skeleton jumping out of a coffin. But you're having trouble getting the sound cue to line up with the movement - calling cues to an employee over a walkie-talkie can only ever be so accurate, and it ties two people at their posts for every run through the haunt! This sucked last season, so you're looking for a way to turn this clunky manual process into a perfect-every-time automated effect.
That's where ShowIO comes in! In QLab, we can create an OSC message cue that tells our ShowIO box to use a digital output to trigger the actuator for our scare effect right when our sound effect is triggered. Let's walk through it step by step:
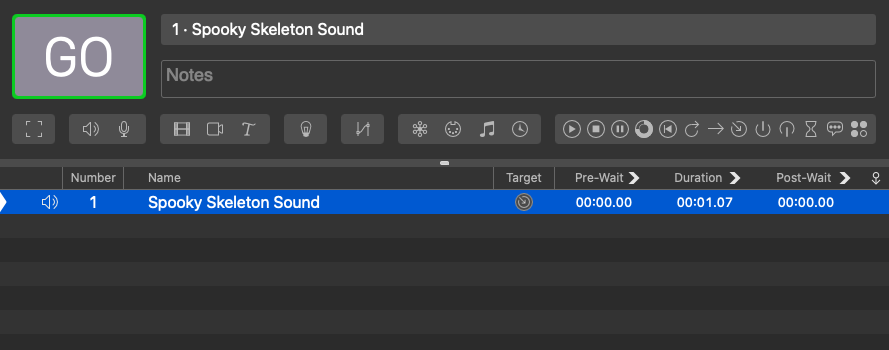
Base QLab workspace
This is our base QLab workspace - just the sound cue. The first thing we need to add is an OSC show control cue: Click the Network icon to add a Network cue:
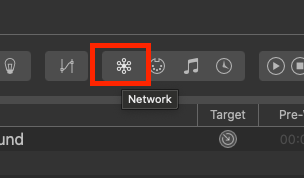
QLab network cue
In our newly created Network cue, click over to the Settings menu. We're gonna see a text entry for an OSC message. To figure out what to send, we'll refer to the (as of writing, unpublished) ShowIO OSC API (Application Programming Interface - a term borrowed from web development), which is our list of all OSC commands needed to control ShowIO.
We want this cue to turn on channel #1 on the ShowIO's digital outputs, which we've carefully wired to trigger our effect actuator. The OSC address to control this channel is /sio/do/1/set - in plain English, "ShowIO, Digital Output, #1, Set to value" - and to turn it on, we're gonna send it the value 1.
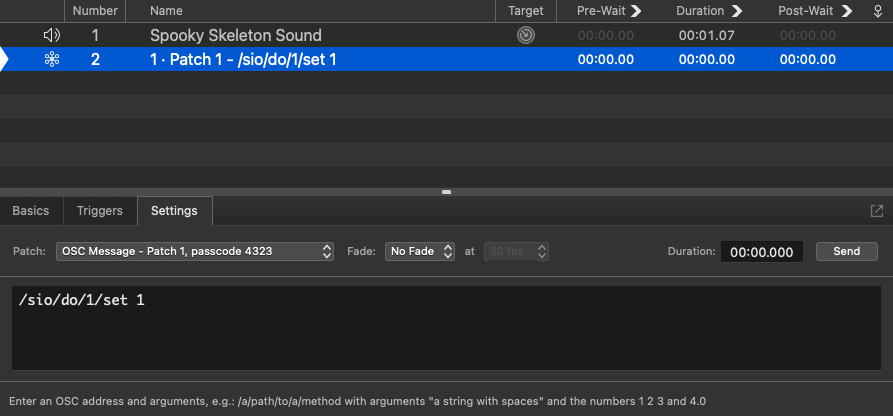
Setting the OSC message in QLab
And as seasoned QLab programmers, we know that setting an auto-continue on the sound cue will trigger the ShowIO command automatically when we hit "GO" on the sound cue.
Next, we need to patch our ShowIO box to make sure that QLab is sending the command to the right destination. Click on the "Patch" dropdown, and open the network settings window.
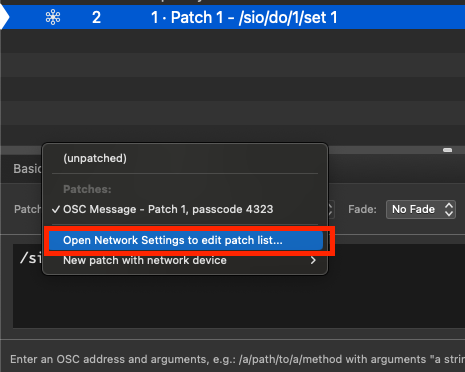
QLab Network Settings navigation
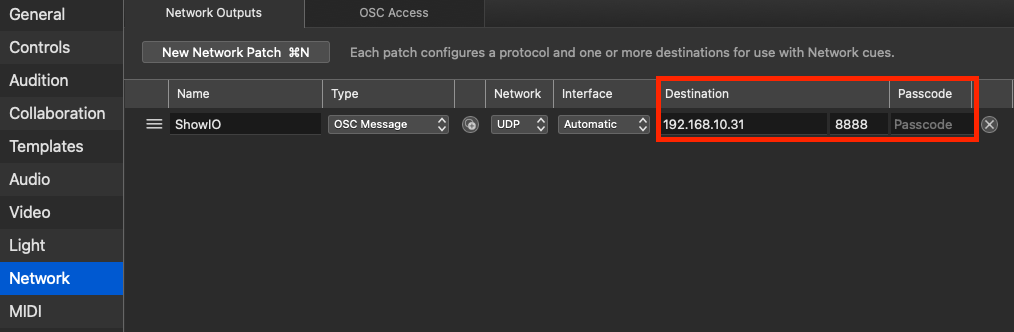
In the Network Settings menu, we're going to add our ShowIO patch with the destination IP address that we set earlier. The default OSC receiving port on ShowIO is 8888, so let's set that too and remove the passcode.
QLab network device patch
We can see that the patch took and is now displaying as ShowIO in the cue list.

Cue list with updated patch
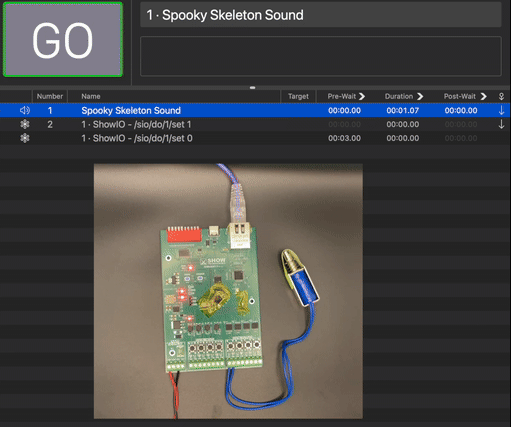
One more cue to add - we want the digital output to turn off after the effect has been active for a couple seconds to automatically reset the scare. We'll do this by adding another network cue with the message **/sio/do/1/set 0** to turn the digital output off, and add a pre-wait of 3 seconds with an auto-continue from the preceding cue. Here's what our final cue list looks like:

Final cue list
Now all that's left to do is test it. Here's the test setup:
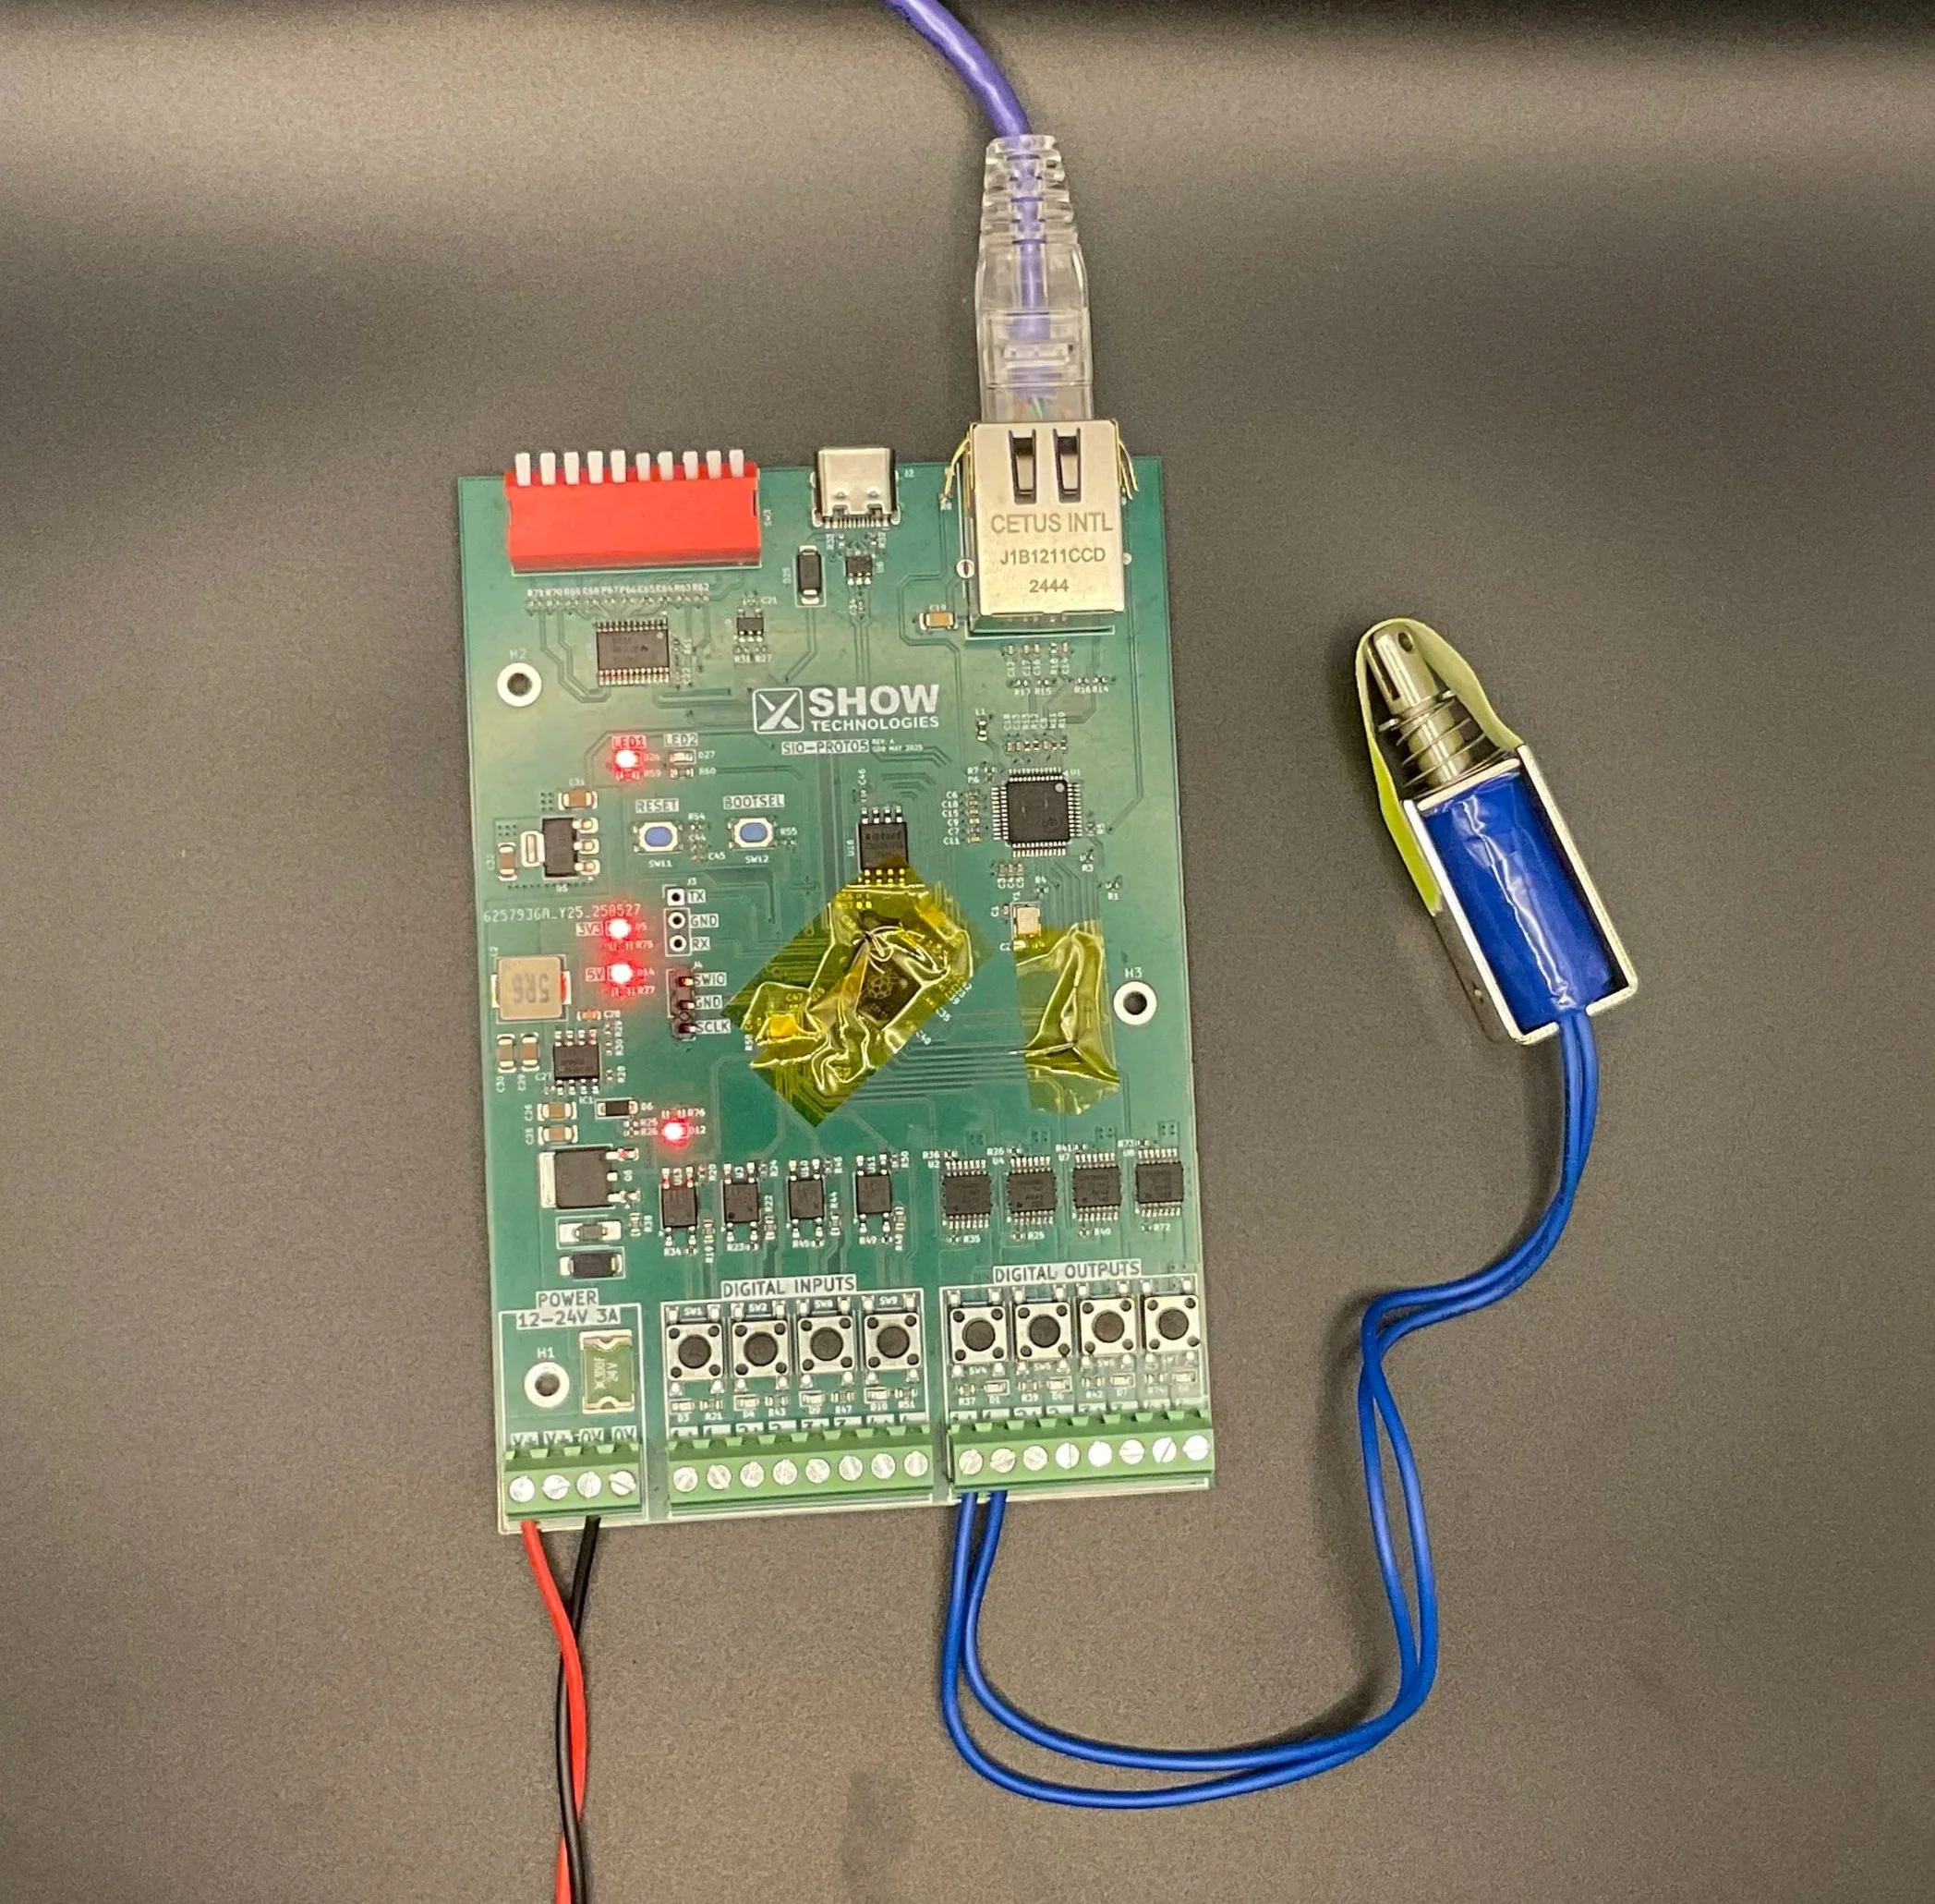
Physical ShowIO test setup
Our ShowIO PROTO5 is connected to our computer via an Ethernet cable, and is getting 12V power from a DC power supply. A 12V solenoid, wired to digital output channel #1, represents our effect actuator.
Let's try it out!
Using QLab and ShowIO to create a synchronized effect
Success! When we trigger our sound cue, QLab shoots a message to ShowIO to tell it to activate the digital output that drives the actuator. Perfectly synchronized, with an automated reset.
This is one of the core use cases we see for ShowIO. In fact, our products have already seen real-world use with this exact integration - last year, Trevor and I partnered with our alma mater, Purdue University, to integrate ShowIO into their production of a stage play that required automated effects tightly synchronized with sound cues. Read Purdue’s press release about that project here: https://www.cla.purdue.edu/academic/rueffschool/theatre/news/dmcp-and-show-technologies.html.
But this is only scratching the surface of what ShowIO can do. In next week’s issue, we’ll explore how to take advantage of ShowIO’s bidirectional communication and distributed networking with some more advanced show control applications.
As always, I’m available at sdick@show-technologies.com to chat about ShowIO or show control in general.